Seasonal menu changes without the chaos
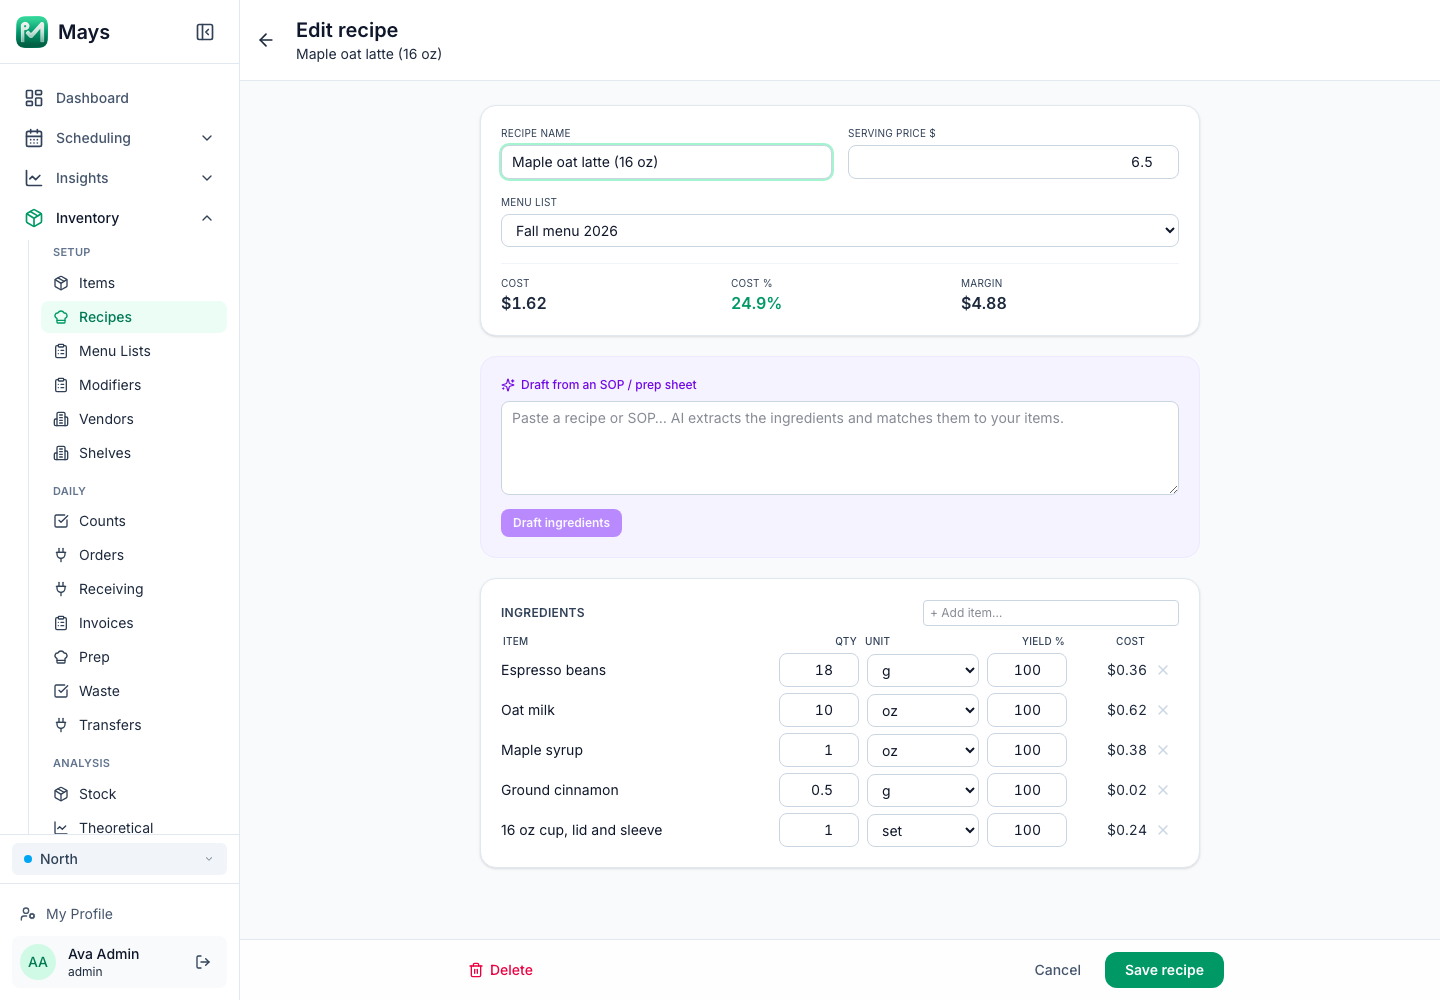
The first seasonal menu at a new café usually goes like this. The new drink is on the chalkboard, but not in the POS, so the barista rings it up as a latte with three modifiers. Half the team has never made it. The maple syrup arrived Thursday instead of Monday. And three weeks later, there's a case of peach purée from summer at the back of the walk-in that nobody knows what to do with.
None of that is a recipe problem. It's a planning problem, fixable with a calendar, a task list and one person who owns the launch. This guide walks through an eight-week plan, from picking the items to retiring what's leaving.
This is general information, not legal advice. Updated September 24, 2026: the FDA and Florida pages cited below were re-checked.
The eight-week calendar
Count back from launch day. Eight weeks sounds like a lot for three drinks, but most of it is waiting for samples and vendor lead times.
When | What gets done | Who |
|---|---|---|
8 weeks out | Pick the concept and a short list of candidates | Owner, lead barista |
7–6 weeks | Test recipes; ask vendors for samples and prices | Lead barista, kitchen lead |
5 weeks | Cost every candidate; cut to the final list | Owner |
4 weeks | Finalize recipe cards, allergens and photos; place the first orders | Owner, kitchen lead |
3 weeks | Write the menu descriptions; order signs and print | Owner |
2 weeks | Train the team; build the items in the POS | Managers |
1 week | Staff tasting; update signs, Google and delivery menus, ready to switch | Managers |
Launch day | Switch everything at once; check the first tickets | Opening manager |
2–4 weeks after | Review sales, waste and build times | Owner |
Don't pick a launch week with a holiday or a big local event in it; our holiday staffing guide covers why those weeks are already full.
Step 1: Pick fewer items than you want to
A seasonal menu for a small café is usually two to four new items, not a new menu. Every item adds an ingredient to order, a recipe to train and a button to find during the rush.
Good seasonal candidates:
- Use what you already stock. A new syrup on your existing espresso and milk is one new ingredient. A new pastry with three new ingredients is three.
- Share ingredients across items. If you buy pumpkin purée, use it in a drink and a muffin.
- Fit your equipment and your line. If it needs the blender during the morning rush, it slows every other drink too.
- Have a clear end date. "Available through November" makes retiring it simple, and gives customers a reason to try it now.
Step 2: Test the recipe like a regular Tuesday
A recipe that works when the owner makes one at 3 pm has to work when a new hire makes six at 8 am. Test for that:
- Write the recipe card first: exact quantities, the order of steps, the cup size, the garnish, a photo of the finished item.
- Have two or three different people make it from the card alone, without coaching. Where they get stuck, the card needs work.
- Time the build. If it takes twice as long as your average drink, decide whether that's worth it at your busiest hour.
- Check the holding time of anything you batch, like a syrup, a cold foam base or a baked item. How long does it stay good, and how will staff know when to throw it out?
- Taste it side by side with the version you want, and adjust one thing at a time.
Step 3: Cost it before you print the price
Seasonal ingredients can cost more than your everyday ones, and their prices can move. Cost every candidate with real vendor quotes. With made-up numbers, a maple oat latte:
Ingredient | Per drink | Made-up cost |
|---|---|---|
Espresso beans | 18 g | $0.36 |
Oat milk | 10 oz | $0.62 |
Maple syrup | 1 oz | $0.38 |
Ground cinnamon | 0.5 g | $0.02 |
16 oz cup, lid and sleeve | 1 set | $0.24 |
Total | $1.62 |
This one counts the cup. Whichever way you choose, do it the same way for every item.
At a 25% target food cost (choose your own), the minimum price is $1.62 ÷ 0.25 = $6.48. Round to $6.50, and check it against what you charge for similar drinks and what's nearby. Our guide to plate costing and menu pricing has the full method, including yields.
Two things specific to seasonal items:
- House-made syrups and bases have their own recipe. Cost the batch (sugar, maple, water, labor aside), divide by the ounces it yields, and use that cost per ounce on the drink.
- Re-check the price mid-season. A seasonal ingredient can jump halfway through. Decide in advance what you'll do: absorb it, change the portion, or end the item early.
Step 4: Check allergens for every new item
New items bring new allergens. A pistachio latte, a sesame bagel or an almond-flour muffin can add an allergen your team has never had to think about at your café.
- The nine major food allergens under US law are milk, eggs, fish, crustacean shellfish, tree nuts, peanuts, wheat, soybeans and sesame; sesame became the ninth on January 1, 2023 (FDA: food allergies).
- Florida inspects restaurants under the 2017 FDA Food Code, adopted effective November 1, 2019 (DBPR: inspections). Under it, the person in charge should be able to describe foods identified as major food allergens and the symptoms they can cause (§2-102.11(C)(9)), and make sure employees are trained in food safety, "including FOOD allergy awareness, as it relates to their assigned duties" (§2-103.11(N)) (2017 FDA Food Code). The 2017 code's list doesn't include sesame, which FDA added in the 2022 edition (FDA: sesame added as a major food allergen), so train on all nine.
- Write the allergens on the recipe card and in whatever staff use to answer "does this have nuts?"
- Check shared equipment: a new nut milk steamed with the same wand as regular milk, or a sesame topping on the same board as everything else.
Calorie labeling on menus is required for chains: FDA's menu labeling rules apply to restaurants and similar retail food establishments "that are part of a chain with 20 or more locations," doing business under the same name and offering substantially the same menu items (FDA: menu labeling requirements). A one- or two-location café isn't covered by that rule on its own, but check your state and city rules.
Step 5: Train the team before launch day
Two weeks out, the whole team should have made each new item at least once. A simple plan:
- A tasting in the pre-shift meeting. Everyone tastes each item, hears what's in it and learns one sentence to describe it.
- Hands-on builds. Each barista makes each drink from the recipe card while a lead watches. Sign them off when they get it right twice.
- The questions customers will ask: "Is it sweet?", "Is it dairy-free?", "Does it have nuts?" Give staff the answers in writing.
- A short quiz for the details that matter: the allergens, the portions, the price.
- Cover everyone, not just the morning crew. The weekend part-timer who works two shifts a week needs it too; schedule a short paid session for people who miss the meeting. Our guide to training your first hires has more on quizzes and sign-offs.
Step 6: Update the POS, signs and online menus on the same day
A common launch-day problem is one place still showing the old menu. Make a list of every place your menu lives, and switch them together:
- The POS: new items with the right prices, modifiers (milk options, extra shot), tax category and the kitchen printer or display they route to. Ring up a test order for each before launch.
- Menu boards and signs inside, the window and the counter.
- Your Google Business Profile: the menu link, photos of the new items and a post about the launch. Our Google Business Profile guide covers where each of those goes.
- Delivery apps and your website: new items added, retired items removed, and prices checked. See what delivery apps really cost for how to price them there.
- Social media: the announcement, with the end date if there is one.
Give one person the list and ask them to tick it off on launch morning.
Step 7: Retire items on purpose
Something probably leaves the menu when the new items arrive. Plan that as carefully as the launch:
- Decide what's leaving and why: slow sellers, low margin, too many steps for the rush, or simply the end of its season.
- Run the ingredients down. Look at what's on hand for items that are leaving, and stop ordering early enough to use it up. Leftover seasonal ingredients are pure waste.
- Remove it everywhere: POS, signs, Google, delivery apps and your website, on the same day.
- Tell your regulars. "Last week for the peach iced tea" sells the last of the purée.
- Keep the recipe card. If it comes back next summer, you won't start from scratch.
Step 8: Review two to four weeks after launch
Look at what actually happened while it's fresh:
- Sales by item from your POS. Which new items sell, and which are ordered once and never again?
- Waste: what's being thrown out, and is it a new ingredient with a short shelf life?
- Build time and complaints: is anything slowing the line or coming back wrong?
- Actual cost: did the vendor price match the quote?
Change what needs changing now, not at the next season. And write down what you learned for next year's launch.
Where Mays fits
- Cost it before you print it: in Inventory → Setup → Recipes, add each ingredient with its Qty, Unit and Yield % and set the Serving price $, and Mays shows the Cost, Cost % and Margin from your vendor prices. The image at the top of this post is the maple oat latte above, built from sample items in our test account. Group the new items in a Menu list like "Fall menu 2026" with a Target cost %.
- Recipe cards staff can find: a Knowledge Base article for each item, with the photo and the allergens, readable in the phone app.
- Training: in Learning, an admin builds a module from those articles, lets the AI write the quiz and assigns it. Learning is switched on for your account by our team.
- The switch-over list: Tasks → Create Task gives each line (POS, signs, Google, delivery apps) to one person.
- Digital signage (a paid add-on): upload photos and videos of the new items, put them in a playlist, and schedule it from launch day, by date, day of the week and time, on TVs running the Mays Player app. It shows what you upload; it doesn't design menu boards.
- Retiring a recipe: Delete marks it inactive, and it can't be switched back on in the app today, so keep the recipe card in the knowledge base if the item might return.
Your seasonal menu checklist
- A launch date on the calendar, eight weeks out, clear of holidays
- Two to four new items that share ingredients and fit your line
- Recipe cards tested by people who didn't write them, with build times
- Every item costed with real vendor prices, and a price checked against the market
- Allergens on every recipe card, and staff who can answer allergen questions
- Every team member trained and signed off before launch
- POS, signs, Google, delivery apps and website switched on the same day
- Retiring items run down, removed everywhere and their recipes kept
- A review two to four weeks after launch
Plan your next menu change in Mays
Cost the new items, put the recipe cards where the team can read them, and turn the launch list into tasks.
Start your free trial: 30 days, every module, no card needed. New to costing? Start with plate costing and menu pricing basics.