Build your own task forms, like a cash count, a temperature log or a waste log, under Tasks → Types. Staff fill them in on the app, and every answer lands in Task Data, ready to export.
Custom forms are part of every plan. With the built-in roles, admins build forms and add them to tasks; managers can see the answers for their locations under Tasks → Data.
Build a form
- Go to Tasks → Types (the page is called Task Types) and click New task type.
- Enter a Task type name and, if you like, a Description.
- To save time, pick one of the presets under Start from a preset:
- Register / Cash count: count coins and bills, add paid-outs, and get the total.
- Waste log: rows of wasted items with a quantity and a reason.
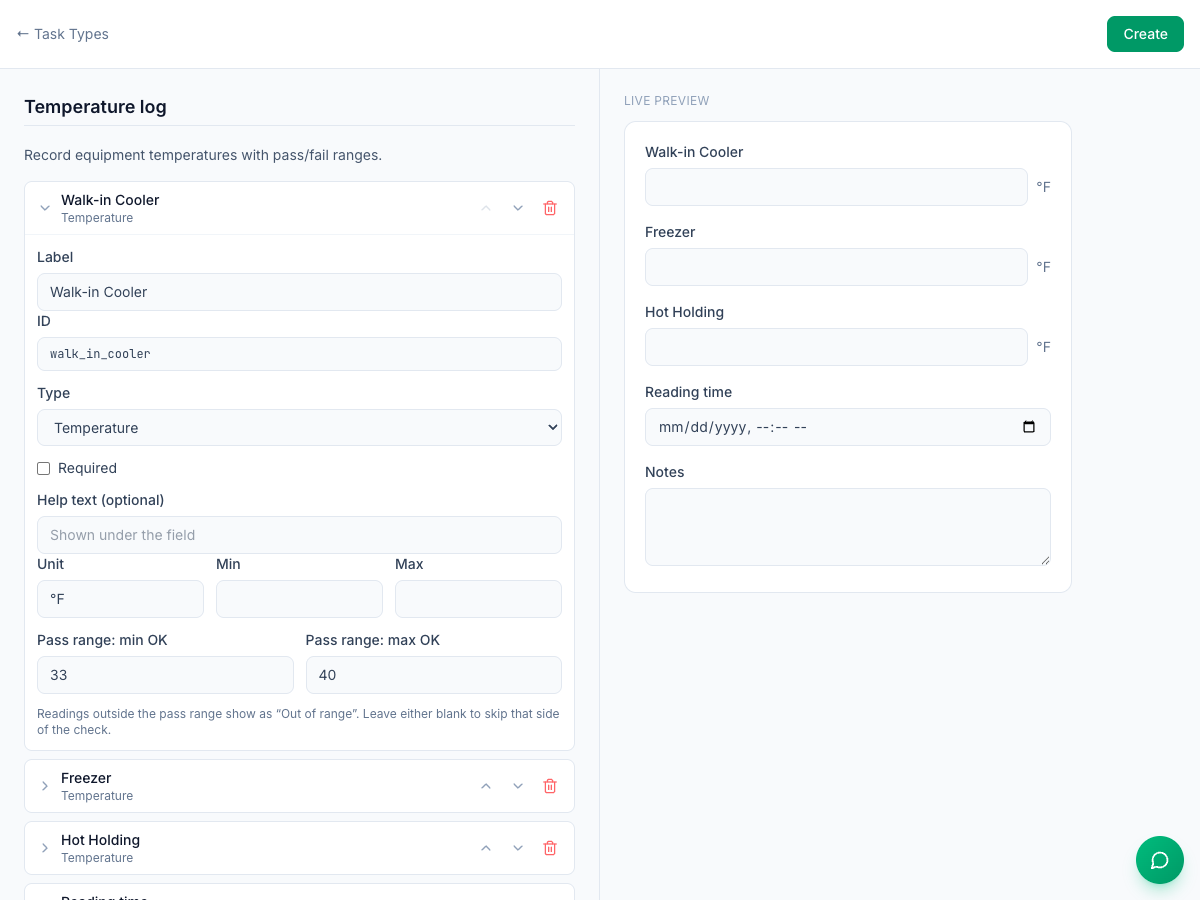
- Temperature log: a walk-in cooler, freezer and hot-holding reading, with safe ranges.
- Delivery checklist: check a delivery against the invoice, with a photo.
- Click Add field to add more fields, and click a field to open its settings: Label, Type, Required and Help text (optional), plus settings for its type. Use the arrows to move a field and the bin to remove it.
- Check the Live preview on the right.
- Click Create.
Field types
Group | Types | Settings |
|---|---|---|
Basic | Number, Money amount ($), Text, Checkbox, Yes / No, Single choice, Multiple choice | Min and Max; Multiline and Max length for text; Options for choices |
Calculated | Cash count (coins/bills), Computed (formula), Repeatable rows | Denominations; the Formula; the fields in each row |
Capture | Photo, Signature, Location, Temperature, Rating, Date / time, Counter, Duration, Barcode | Unit and a pass range for temperatures (In range / Out of range); Number of stars; Date only, Time only or Date & time |
Reference | Employee, Branch / area (a location), Inventory item, Vendor | — |
Layout | Section header, Instructions, Divider | — |
Formulas add up or compare other fields. Refer to a field by its ID, and use + - * /, brackets and sum, min, max, round, abs and if. For example, coins + bills. Fields inside repeatable rows can't be used, and results are rounded to whole numbers.
Repeatable rows let staff add as many rows as they need (Add row), for example one row per wasted item.
Use it in a task
- In a checklist template: set the task's answer type to Custom form. In Edit Task, pick the form under Task Type and save. See Creating a checklist template.
- In a one-off task on the web: Tasks → Tasks → Create Task → Custom Task, set Response Type to Custom form and pick the Task Type.
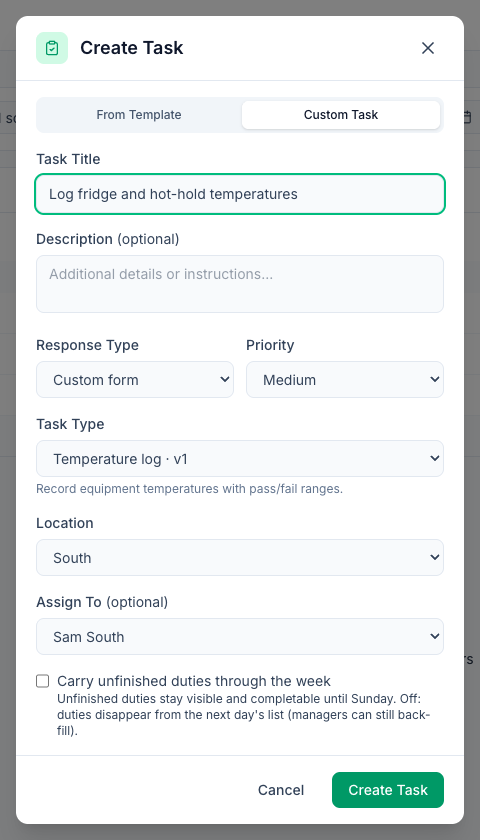
Only people who can see Tasks → Types (admins, by default) can pick a form. One-off tasks made in the apps can't use a form.
Fill it in
Staff open the task in the iPhone or Android app and tap Fill out form. Submit turns on once every required field is filled in and nothing is out of bounds.
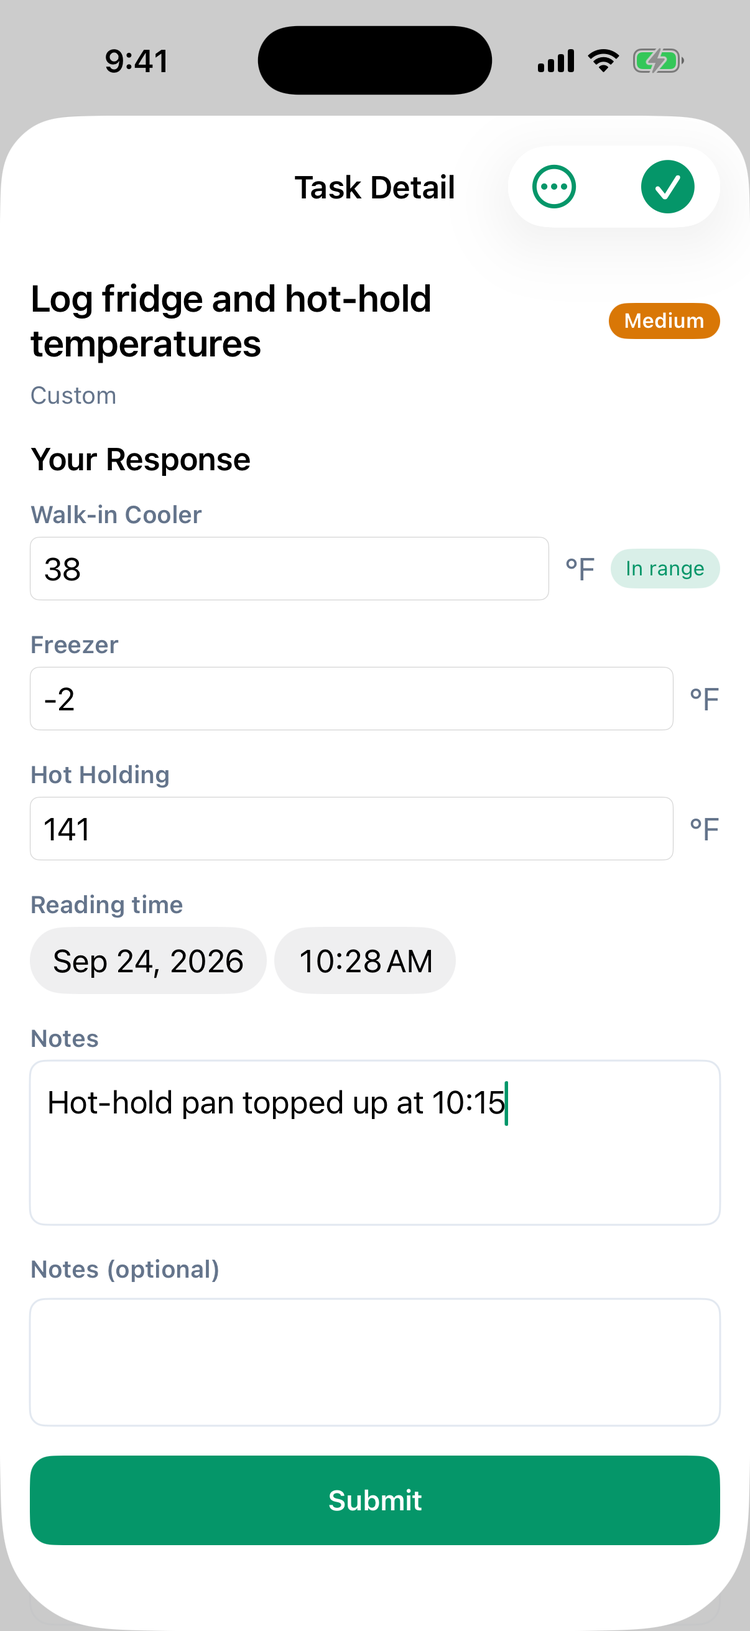
Photos in a form are taken with the camera. A new form can't be filled in on the web; there, someone who can manage tasks can open a submitted form under Tasks → Tasks and click Edit to correct it.
See and export the answers
- One task: under Tasks → Tasks, click the task. Submitted Response shows the whole form. In the app, open the completed task.
- All answers: go to Tasks → Data (Task Data). Pick the form on the left and the dates at the top (the last 14 days to start with). The location is the one picked at the bottom of the sidebar.
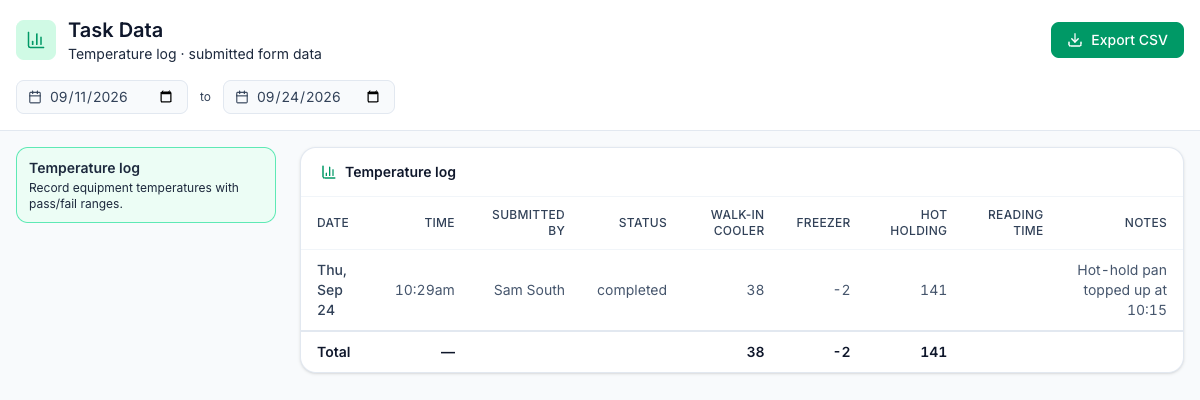
Task Data lists completed tasks and tasks waiting for review, not rejected ones. Each field has a column, except photos, signatures and locations, and a Total row adds up every number column. Export CSV downloads the table. See Task Data: viewing and exporting form answers.
Change or delete a form
- Change: click the form on Task Types, edit it and click Publish new version. Tasks already created keep the version they were given. Templates keep the old version too: open the task in each template and pick the form again under Task Type to move it to the new one. Task Data always shows the columns of the newest version.
- Delete: ⋮ → Delete on Task Types. Tasks already using it still work. A template that uses it keeps making tasks, but can't be saved until you pick another form for that task. The form's answers no longer appear in Task Data.
Good to know
- Reference fields in the apps. On iPhone and Android, Employee lists the people at the task's location, Branch / area lists your company's locations and Vendor lists the vendors that deliver to the task's location (or to every location). Staff on an older app version see This field isn't supported on mobile yet and can't submit a form where one is required until they update the app — the form builder reminds you when you tick Required on one.
- On iPhone, a Date / time field shows the current date and time but saves nothing until you change it, and the In range label only appears when both ends of the pass range are set. Barcode can be scanned on Android (the web form says Scan available in the Android app); on iPhone, type the code.
- Money: negative amounts show as $-4.40. A Computed field you add yourself shows cents with no $ sign, and Min and Max on a Money amount field don't work as dollars yet, so leave them empty.
- Photos in a form aren't checked by AI photo verification. Only tasks whose answer type is Photo are.
- Waste log answers also take the wasted items out of your inventory stock and appear on the Waste Log. See Logging waste.
- You can also set an alert when a number on a form goes over or under a limit, under Insights → Alerts & Reports. See Alerts and scheduled reports.
- Fridges and freezers can log themselves: wireless sensors record a temperature every five minutes and alert your team. See Setting up Govee thermometers.