Your team tells you when they can work from the Mays app. As a manager you approve or decline those requests, see everyone's week at a glance, and can enter availability for someone yourself.
Where: Scheduling → Availability on the web, for the location picked at the bottom of the sidebar. It has three tabs: Requests, Glance View and Reasons. In the app, requests wait under Schedule → Approvals.
For how staff send availability, see Setting your availability.
Approve or decline a request
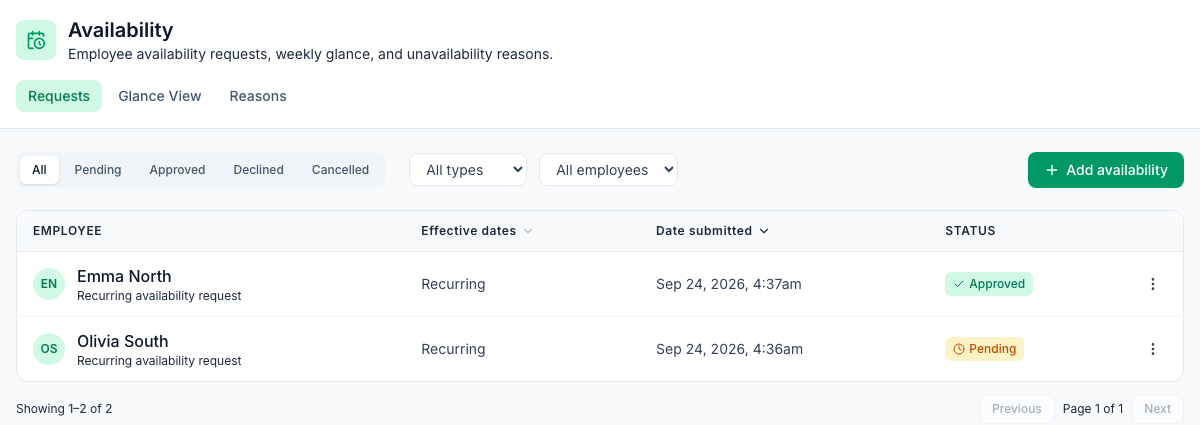
- Go to Scheduling → Availability. Requests lists every request at the location — click Pending to see the ones waiting. You can also filter by type (Recurring or Temporary) and by person.
- Click a request.
- Compare Requested availability (what they asked for, day by day, with any reason and note) with Current live availability (what's in effect now — it stays active until this request is decided).
- Optionally add a Decision note. They see it when they open the request in the app; it isn't in the notification.
- Click Approve or Decline.
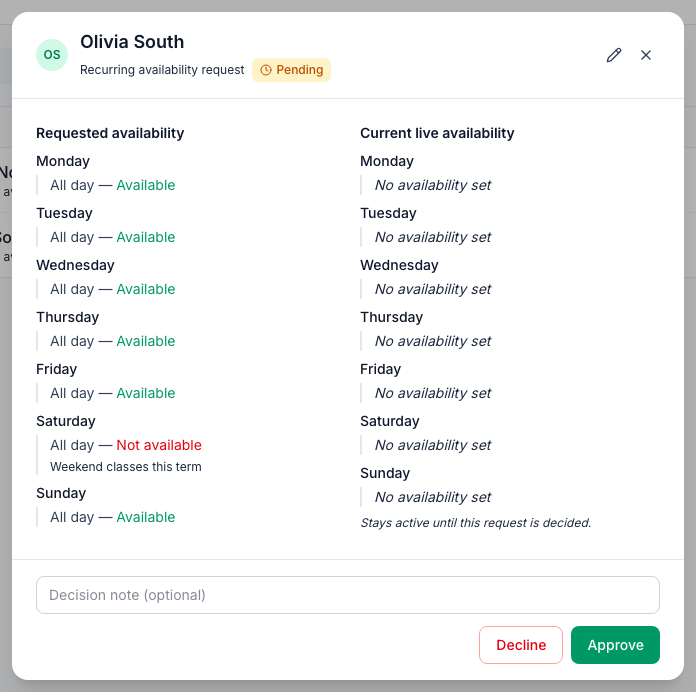
They get Availability approved or Availability changes declined.
- Approving a recurring request replaces their normal week. Approving a temporary one applies it for its dates only, then their normal week comes back.
- Declining leaves their current availability as it was.
- Approve and Decline are also in the row's ⋮ menu (without a note), along with View and Delete.
- Approved availability doesn't move shifts that are already on the schedule. The grid and the publish warnings show the clashes — see Building the weekly schedule.
In the app: go to Schedule → Approvals, tap a request under Availability, check Requested and Current, add a Decision note (optional) and tap Approve or Decline. Managers also have Schedule → Availability with Requests, Approved and Mine. On a declined request the app still says Approved by before the name of whoever decided. See The approvals inbox.
Your own availability: managers can't approve their own availability unless an admin allows it; an admin always can.
- Managers can't approve or decline their own request — on the web or in the app. It shows Waiting for another manager instead of Approve and Decline, and stays Pending until another manager of your location or an admin decides it. You can still edit it while it's pending. Once it's approved, ask another manager or an admin to change it, or add new availability for review.
- Admins (anyone who can edit organization settings) can approve or decline their own request like any other — nobody is above them, so a one-owner business isn't stuck. The decision note records it: Self-approved by an org admin.
- To let managers approve their own, an admin turns on Managers can approve their own requests under Scheduling → Settings → Approvals — see Scheduling settings. It covers availability and time off together. A manager's own request then has the usual Approve and Decline, and the decision note records it: Self-approved by a manager.
- If your company doesn't require approval for availability, none of this applies — everyone's availability, yours included, takes effect as soon as it's saved.
See everyone's week
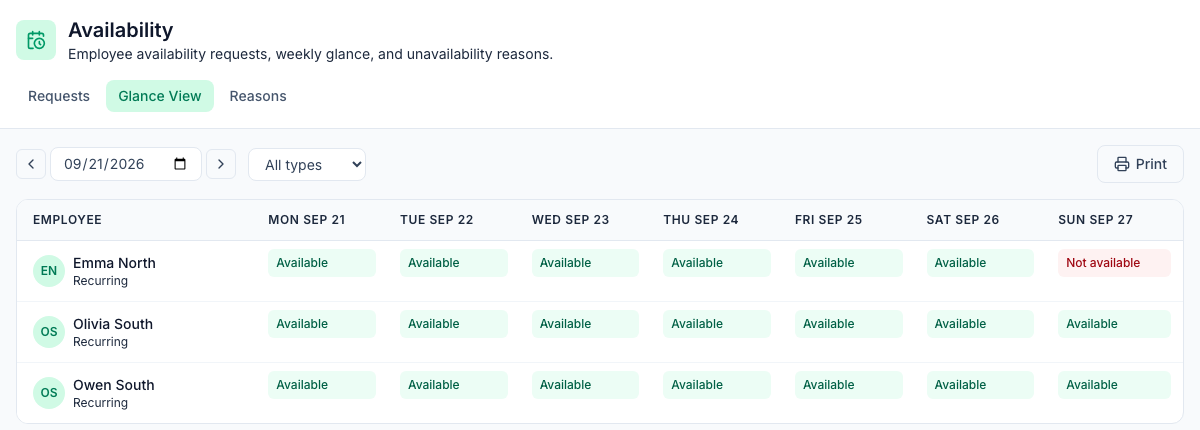
Glance View shows each person on the location's schedule for one week: green Available, amber when they're only available part of the day, and red Not available. Under each name, Recurring or Temporary tells you which kind is in effect.
- Use the arrows or the date box to change week, and All types to show only recurring or temporary patterns.
- Print prints the grid.
- Only approved availability is shown — pending requests aren't.
Enter availability for someone
Click Add availability, pick the Employee and the Type (Recurring, or Temporary with From and To dates), set each day — All day or a time range, Available or Not available, a reason and a note — and click Save.
- It takes effect straight away — no approval needed — and they get Availability added.
- Your own availability is the exception for managers: when you pick yourself, it's added as Pending (the form says so) and another manager or an admin approves it — unless Managers can approve their own requests is on. An admin's own is added as approved and recorded as self-approved.
- It cancels any request of the same kind they were still waiting on.
- To change or remove one, open it and use the pencil (Edit) or Delete. They're told either way.
Reasons
Reasons is the list staff choose from when they're not available, like School or Second job. Admins manage it: Add reason, with the Reason, a Sort order, and Comments required if staff must also explain.
- As soon as there's at least one reason, every "not available" day needs one — staff can't send availability without it.
- Deleting a reason that's in use makes it Inactive instead. An inactive reason can't be switched back on from this screen; add it again.
- Managers see the buttons too, but only admins can save changes; a manager's Delete does nothing.
Settings
- Scheduling → Settings → Approvals → Require manager approval for availability changes (admins, on by default). Turn it off and staff availability takes effect as soon as it's sent, with no request for you. See Scheduling settings.
- Temporary availability on each location's Scheduling tab (on by default) decides whether staff see the Temporary option in the app. Temporary patterns already approved keep applying if you turn it off.
Good to know
- Who can do this: managers for the people at their locations, and admins. While approval is required, you're notified of new requests (New availability request) from everyone who works at your locations.
- The auto-scheduler and Find cover use approved availability — see Auto-schedule with AI and Finding cover for a shift.
- Glance View and Reasons are on the web only.