Menu photography with a phone: a café's guide to food photos that sell
The photos of your food do a lot of selling before anyone tastes it. They're on your Google profile, your delivery app menus, your Instagram grid and maybe the TV over the counter. In a new café, they're often whatever someone shot at closing time under the kitchen lights.
You don't need a photographer for good menu photos. You need a window, a clean surface, a phone with the right settings, and one quiet morning. This guide covers how to shoot, how to edit honestly, and what each platform asks for, so you shoot once and use the photos everywhere.
It's the sixth post in our Marketing a new café series. For video, see short video on a phone.
Platform requirements were checked on the companies' help pages on October 5, 2026. Phone features vary by model.
Step 1: Find your light
Light matters more than the phone.
- Shoot by a window, in daylight. Uber Eats' advice to restaurants: "If possible, set up the food on a table with indirect, natural sunlight coming from a window" (Uber Eats: menu photography guidelines).
- Avoid harsh light. The same page says: "Don't shoot food under bad fluorescent lighting." Turn off the overheads if they tint the food.
- Soften direct sun with a sheet of white paper or a thin curtain between the window and the plate.
- Bounce light into shadows with a white menu card or a piece of foam board on the other side of the plate.
The best time is usually mid-morning, before the rush and when the light is bright but not direct.
Step 2: Background, props and angle
Keep the background simple. DoorDash asks for photos that "clearly show menu items in proper lighting, without text or other overlays", with "a neutral background" (DoorDash: photo requirements). A wooden counter, a marble table or a plain plate works.
Pick the angle for the item:
Item | Angle | Why |
|---|---|---|
Latte with art, bowls, pizza, salads | Straight down (overhead) | Shows the pattern and everything on top |
Iced drinks, layered drinks, burgers, sandwiches cut open | Eye level or slightly above | Shows the layers |
Pastries, plated breakfast | About 45 degrees | How a customer sees it at the table |
Garnish honestly. Uber Eats suggests adding a garnish "to create a splash of color. Just be sure your photo is still a true representation of the dish." That's the rule for everything in this guide.
Step 3: Phone settings that matter
iPhone:
- Focus and exposure: "Tap the screen where you want to move the focus area. Next to the focus area, drag up or down to adjust the exposure" (Apple: camera tools). Food usually looks better slightly darker than the camera picks.
- Portrait mode: keeps the subject sharp "while creating a beautifully blurred foreground and background" (Apple: portraits). Good for a single drink or pastry.
- HDR: "By default, iPhone takes photos in HDR ... when it's most effective" (Apple: HDR).
- Low light: "On supported iPhone models, Night mode automatically brightens photos", and Apple's tip is to "Use a tripod for even more detailed Night mode photos" (Apple: Night mode). Better still, shoot in daylight.
- File format: Apple says that "capturing in HEIF and HEVC format is recommended", but not every site or TV can show HEIF. Under Settings → Camera → Formats → Most Compatible, "All new photos and videos will now use JPEG or H.264 format" (Apple: HEIF and HEVC media). JPEGs are easier to upload everywhere.
Google Pixel: tap Portrait in the photo mode carousel, and "To lock the focus and exposure on a subject that moves, tap Lock" (Pixel: Portrait mode).
Everything else: clean the lens, turn the flash off, and hold the phone with both hands or prop it on something.
Step 4: Shoot for every place you'll use it
Different platforms want different shapes, so plan for them while you shoot:
Where | What it asks for |
|---|---|
Google Business Profile | JPG or PNG, 10 KB to 5 MB, 720 × 720 px recommended (Google: photos and videos) |
DoorDash | "All menu photos must be landscape (16:9)", "Minimum resolution: 1400 × 800 pixels" (DoorDash: photo terms) |
Grubhub | Square (1:1), at least 200 × 200 pixels; it doesn't accept "Photos of coupons, weekly specials or restaurant interior/exterior" (Grubhub: menu overview) |
Instagram feed and Reels | Square or portrait for the feed; 9:16 for Reels and Stories |
DoorDash's tip is direct: "If you're using a phone, rotate it sideways before taking the photo." The simplest approach is to shoot each item landscape with space around it, so you can crop it square, portrait or 16:9 later without cutting off the food.
Step 5: Edit, don't fake
Edit on the phone. In the iPhone Photos app, swipe "under the photo to view the settings you can adjust—for example, Exposure, Brilliance, or Highlights" (Apple: edit photos). Edit one photo, then "copy the edits you made to one photo ... and paste them onto another photo, or a batch" so the whole menu matches. Crop presets include "Square, Wallpaper, 9:16, or 5:7" (Apple: crop).
Don't misrepresent the food. Google's photo tips: "The photo should be in focus, well lit, and have no significant alterations or excessive use of filters or AI. In other words, the image should represent reality" (Google: business photo tips). The FTC's general rule for advertising applies to menu photos too: "Advertising must be truthful and non-deceptive", and the FTC looks at "words, phrases, and pictures" to judge what an ad conveys (FTC: advertising FAQs for small business).
In practice: shoot the portion you serve, in the cup you serve it in. Brighten and straighten; don't add what isn't there.
Step 6: A one-morning shoot plan
- The day before: list every item to shoot, in order of what sells most. Prep extra garnish.
- Set up at 9:30: one table by the window, a plain surface, a white card for bounce light.
- Shoot in batches: drinks first (ice melts and foam settles), then pastries, then plated food. Make each item fresh, the way you'd serve it.
- Three shots per item: overhead or 45 degrees, a landscape version for delivery apps, and one close-up.
- Check on a bigger screen before you clear the set.
- Edit that afternoon: one look, pasted across every photo.
- Upload the same week: Google, delivery apps, your website menu, Instagram.
Reshoot whenever an item changes. Our guide to seasonal menu changes puts photos into the launch plan.
Step 7: Keep the plate matching the photo
A great photo creates an expectation. If the drink that shows up looks different, that's a complaint waiting to happen. Delivery customers notice first, and our guide to delivery app costs covers why order accuracy matters there.
Use the menu photos as the plating standard. Put them where the team sees them, and check now and then that the line matches.
Where Mays fits
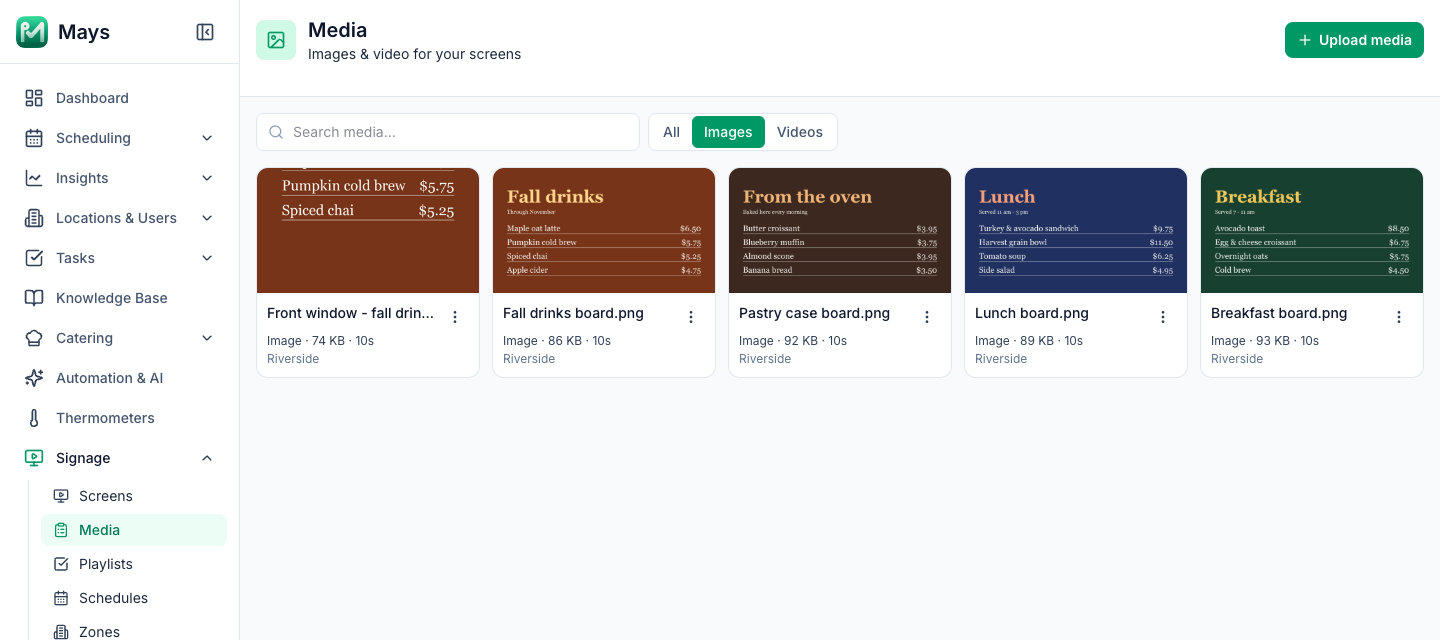
- Your photos on your own screens. With the Digital signage add-on, you upload images to Signage → Media and put them in playlists for the TVs in your café. The image at the top of this post shows five menu boards uploaded for one location. Images can be JPEG, PNG, WebP or HEIC, up to 10 MB, but use JPEG or PNG for iPhone photos: HEIC uploads, but most TVs and browsers can't show it. Images fill the whole screen, so design boards at 1920 × 1080 for a TV mounted normally, or 1080 × 1920 for one on its side. There are no built-in templates: design the board in a design app with your new photos, then upload it.
- The plating standard, with the photo. Put each item's photo and build in a Knowledge Base article; the editor has Insert Image, and staff can search it from their phones.
- Checking the plate matches. Add a "Photo of today's first latte and pastry plate" task to the opening checklist with a Photo answer. With AI photo verification on (each check uses AI credits), Mays scores each photo against the task and flags weak ones for the manager to review.
Your menu photo checklist
- Window light, mid-morning; overheads off
- Plain background, simple props, honest garnish
- Focus and exposure set by tapping; JPEG format
- Each item shot landscape with space to crop
- Edits pasted across the set; nothing added that isn't served
- Sizes for Google, DoorDash, Grubhub and Instagram
- Photos reused for menu boards and the plating standard
- Reshoot when the item changes
Put your best photos to work in the café
Shoot once, then use the photos on your TVs and in your training.
Start your free trial: 30 days, every module, no card needed. Want to see digital signage set up for your café? Book a walkthrough.